Sunday, January 24, 2010

Dr. Ellington Darden


About a year ago, I decided it was time to start working out the right way. I had gotten back into shape, but it was getting harder to STAY in shape. I found that my bodyfat had increased from 19% ( not bad for my age), back up to 25%. Yikes. Even though I'd built a fair amount of muscle under that fat, something had to be done.

So, I contacted a trainer, Dr. Ellington Darden, whom I'd been reading about online for awhile. He's an older guy, and was one of the original Nautilus bigwigs back in the 70s. He's also the most prolific fitness writer in history, with tons of books he's authored. I've now been working out with him for right at a year now, and have had great results. I got my bodyfat down to 12% initially, and then took it down to 9%. At 42+ years old, that was probably a bit low for me to maintain, and I got sick. So now I stay in the 12% range, which is ideal.

So that's the boring background to this post. Now, Dr. Darden, is creating an all new website, and I did this cartoon version of him for it. He's 66 now, so I had to make an older, but still very buff guy for this. Hope you like it.

And if you want to check out his current site ( there's a story on there about me, and before and after pix too), go to www.drdarden.com

Monday, January 18, 2010

Sharpie Caricatures

Continuing my Sharpie posts, for two or three years in a row Sharpie has used me and several other artists to draw at their booth at a big ESPN fan festival here in Orlando. I mentioned this a few days ago on a post about drawing on my daughter's book bag.
We have lines everyday, all day long when we do these. We have a lot of fun, and so do the guests.
Ah, here's one of me ( hiding from the hot Florida sun in my cool Sharpie hat). The following photos are some I did at these events ( I have photos of the guests WITH their drawings, but I don't want to be concerned about photo rights, etc... so you'll just have to trust me that the drawings look like them!).
A "Track Star"
A Football Kid... drawn in a slightly different style. I used one of the wedge Sharpies for the thick, outside line. Tried to get a "Dexter's LAb" or "PowerPuff Girls" look to it.
I really like the ink in the Sharpies and how the tips never break.
For shading on these, I did use Prismacolor black pencils, from Sanford.
A barbarian.
And of course "Flying Feet of Fury".

Thursday, January 14, 2010

Tutorial: Painting and Drawing on your Child's School Bag, part 4!

Okay, so yesterday we got up to putting down the final colors on the EVIL dark blue canvas school bag. Today is our final installment, so let's get to it....

STEP SEVEN: Drawing with Sharpies!!!!

Ah, the ever durable Sharpie marker. They're everywhere, and they never seem to run out of ink. I drew for Sharpie and ESPN two years in a row at a big caricature gig here locally in Orlando, so I actually have quite a few of them left over. To be honest, the Sharpies even did well on the first version of my daughter's bag, but it was that darn DARK BLUE canvas that made the lines difficult to see. This time around, with the smooth acrylic paint base, I knew the Sharpies were the perfect tool for the drawing:
I carefully outlined everything with the markers, and the rest is history! Oh, except for the final thing...

the "Big Pay Off"...

The "happy customer"...

Now is that a happy little girl, or what? I can't tell you how excited she was, and how proud I was.

I hope you enjoyed this tutorial, and that it even may help you. Remember... keep on toonin'!

Wednesday, January 13, 2010

Tutorial" Painting and Drawing on your Child's School Bag, part 3

STEP FOUR: Final Sketching

For this step, I got out the old crayola crayons. I wanted a color that wouldn't stand out too much if I didn't cover it completely, so I used a light orange. That's because it was the closest thing to the light flesh paint.
It's a bit hard to see, but I adjusted the photo in Photoshop to try and help. Basically I just redrew my original drawing from memory. I also roughed in the letters of the name here with the orange.
STEP FIVE : More colors

Now I began to really get going. The piece started to come to life as I filled in her hair and eye colors.

STEP SIX: Final Colors

Pretty self explanatory. I finished her name and hair bands in pink, and then got out the old "puffy paint" I'd used on the original bag a few months ago. I put puffy lines in the bands, the name, the heart, and the flower. Also, you'll notice I put those little "spark" lines in pink and yellow around her head. They're simple but effective. They also serve another purpose- color BALANCE. See, up until I put yellow "sparks" and yellow in the hair bands ( barely visible in this photo), the only yellow in the "picture" was in the flower. A real artistic "no-no". You want colors echoed throughout the painting. Not in just one place, or it's glaring to the eye.

Next time... DRAWING on the bag.

Monday, January 11, 2010

Tutorial: Painting and Drawing on your Child's School Bag, Part 2

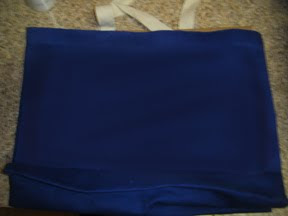
Okay, I've had a few people email me so far, and NO, I'm not showing you the original version, the dreaded "Birthday Cake Bag". LOL. Let's just forget it ever happened. Anyway, right before Christmas break, I bought a second DARK BLUE, EVIL, CANVAS BAG from my daughter's preschool. But this time, I had a plan....
I used to do some acrylic painting and still have some of my supplies in an old fishing tackle box. I pulled them all out, a plastic plate for a palette ( you can barely see it here... it's invisible!), and a few paper towels. Oh, and a water cup for the brushes.
I bought this cheap, but really good acrylic paint in a bottle at Michael's Crafts called "Craft Smart". I also bought something called "acrylic medium" to mix in with the paint when using it on cloth. I never even used it though, so save yourself some money.
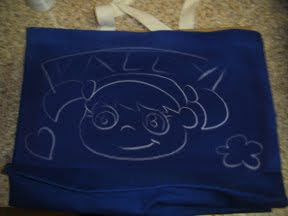
STEP ONE: Sketching

Penciling out the design. I used a Prismacolor White pencil for this stage. I drew it very lightly, and "pumped it up" in Photoshop for you to see it here. Really, make it VERY light. And keep in mind that it's a rough guide. A word of advice here... don't get intimidated if you're not very artistic. Remember, I draw for a living. Really, whatever you draw, your kid will be happy with. Just because YOU did it. My daughter's "Birthday Cake Bag" description of my first failed school bag decoration attempt just proves that.
STEP TWO: White Base Painting

Since this is a canvas bag, I found on the first go around that it was hard to just draw on. Add to that the fact that it's dark blue, and it was a real challenge to get a marker to show up on it. So, this time I knew I had to have a lighter, smoother base to decorate. That's where the whtie acrylic paint comes in. I painted a few layers of it over my rough sketch, keeping it as smooth and "un- bumpy" as possible.
This is another shot of the white, all finished. It was pretty thick by this point. I have to admit, I'm a bit impatient with waiting for paint to dry ( one reason I haven't done it in awhile), so I did take out a hair dryer to "help things along". If you do that, though, keep it a safe distance from the material. I'm not responsible for the bag catching on fire! LOL

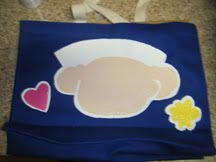
Step Three: Color Base Painting

On this stage, I used my the "Light Flesh Color" paint I also bought at Michael's to cover all the parts of my daughter's head. You'll notice I even painted what will be her hair flesh colored, just to make that area thicker and easier to draw on later. The toughest part was keeping the paint thick but also smooth. Acrylic can get "bumpy" and that makes it harder to draw on.

Obviously I also put in the pink for the heart and the yellow of the flower. I decided on this bag to go ahead and leave a white "halo line" around everything as well, just to make the items on the bag "pop" when you look at them.

To Be Continued...

Saturday, January 09, 2010

Tutorial: Drawing and Painting on your Child's School Bag, part 1

Okay, settle back, get a cup of coffee prepare to read a story. A story about me and my adventures in painting a school bag for my daughter. This is the bag in the picture above. It's innocent and unassuming looking, and it comes from a really good preschool my youngest daughter attends. But don't let the looks of the bag fool you...

... it's EVIL!!!! EVIL, I tell you.

See, it's canvas. DARK BLUE canvas. At this school, it's custom for the parents to decorate their child's bags. This usually means the Moms do it. However, since I'm a Dad who's blessed enough to work out of his home as a professional cartoonist, I was assigned to do this task by my lovely wife. I found this out on the first day of school, a Friday. They gave us the bag and said we had the weekend to decorate it. I figured this wouldn't be a problem. That's before I found out the bag was EVIL.

And carnivorous.

It thwarted all my normal attempts to decorate it. It ATE the markers I tried, DEVOURED the paint from the cute spray on bottles I bought, and in a few days SHED the cool little foamy hearts and flowers I applied. Obviously I was dealing with a dark, malevolent, superior alien intelligence.

Finally I just covered the thing with my daughter's name and some swirly, twirly lines, all done in white and shades of pink "puffy paint". My wife, who'd entrusted me with this project, was extremely non-impressed with my results. My three year old called the results her "Birthday Cake Bag", and seemed pleased as could be. Bless her heart.

But I, on the other hand, was devastated. It seemed to me that everyone else's bags were SO much better than mine. They had stuff sewn on, heat transferred, painted, bedazzled... everything. Seriously, there are some talented, "crafty" Moms out there. I was humbled. I found in my internet searches on this subject, that there's not even a lot of good info out there. "Canvas bag drawing", "School bag drawing", "EVIL school bags" ... none of those searches seem to generate satisfactory results. So, hopefully, my next few posts will help other parents who find themselves in this same predicament.

Because for the entire Fall semester, I brooded, I schemed, and I planned my revenge....

To be continued...


Friday, January 08, 2010

Rubel

A fellow caricaturist, Rubel Mujica, sent me a really nice note recently and a cool caricature of me for my collection. In the note he spoke about how much he liked the book I came out with a few years ago, and how much it has helped him.

I'm glad it did, Rubel, and thanks for letting me know! Here's a quick caricature of you, right back at ya!
Keep on toonin', man!

(Here's the photos I used as reference, by the way.)

Monday, January 04, 2010

Interview with a Cartoonist...

A few weeks ago, I got an email request for an interview from David over at "David-Wasting-Paper" blog. David ( he of no last name), runs a really cool blog where he interviews well known cartoonists. I was very honored to be asked. I love the site, and have made it a regular read now.

Here's a snippet of my interview to tease you with:

Cartoonist Survey #33

Keelan Parham is a cartoonist from Florida who specializes in caricatures and comic book illustration. His work has appeared in many forms of media including children’s books, magazines and comic books. A member of the National Cartoonists’ Society, he is the author of “Let’s Toon Caricatures.” Keelan owns his own company, Caricature Connection which provides caricaturing for special events, corporate functions and individuals. Don’t live in the Florida area? Don’t worry, you can fill out the online order form and receive your caricature digitally or in the mail. If you are ever at Walt Disney World’s Animal Kingdom you can stop into one of the Caricature Connections retail locations. Stop by Keelan’s website, his blog and also Caricature Connection.


You'll have to visit David's blog to read the entire interview:
http://david-wasting-paper.blogspot.com/2009/12/cartoonist-survey-33.html

Saturday, January 02, 2010

Happy New Year!!!!

Have a great, blessed, busy 2010. May God bless you and yours!